STOMP(Simple Text Oriented Messaging Protocol)은 중개 서버를 통해 클라이언트 간에 비동기 메시지를 전달하기 위해서 설계된 간단한 상호 운용 프로토콜이다. 이 프로토콜은 클라이언트와 서버 간에 전달되는 메시지에 대한 텍스트 기반 형식을 정의한다. STOMP는 활발히 사용되어 왔으며 많은 메시지 브로커와 클라이언트 라이브러리에서 지원되고 있다.
STOMP는 TCP 및 웹소켓과 같은 신뢰할 수 있는 양방향 스트리밍 네트워크 프로토콜을 통해서 사용할 수 있다.
ActiveMQ는 대표적인 메시지 브로커이고 STOMP를 지원한다.
이번 포스팅에서는 spring boot에서 STOMP와 ActiveMQ를 이용하여 메시지 broadcasting 하는 방법에 대해서 기록한다.
ActiveMQ docker 설치
메시지 브로커 역할을 하는 ActiveMQ를 docker compose를 통해서 설치한다. 이를 위해서는 docker 엔진이 구동되어야 한다.
version: '3.1'

services:
  db:
    image: islandora/activemq:main
    restart: always
    environment:
      ACTIVEMQ_AUDIT_LOG_LEVEL: INFO
      ACTIVEMQ_LOG_LEVEL: INFO
      ACTIVEMQ_USER: admin
      ACTIVEMQ_PASSWORD: admin_password
      ACTIVEMQ_WEB_ADMIN_NAME: admin
      ACTIVEMQ_WEB_ADMIN_PASSWORD: admin_password
      ACTIVEMQ_WEB_ADMIN_ROLES: admin
    ports:
      - 8161:8161
      - 5672:5672
      - 61613:61613
      - 61614:61614
islandora/activemq 이미지를 설치하였고 해당 이미지에 대한 설명은 docker hub 페이지를 참고하면 도움이 된다.
activemq 관리 페이지는 http://localhost/8161 로 접속할 수 있다.
샘플코드
Dependency
필요한 dependency는 아래와 같다.
<dependency>
    <groupId>org.springframework.boot</groupId>
    <artifactId>spring-boot-starter-websocket</artifactId>
</dependency>

<dependency>
    <groupId>io.projectreactor.netty</groupId>
    <artifactId>reactor-netty</artifactId>
</dependency>

<dependency>
    <groupId>io.netty</groupId>
    <artifactId>netty-all</artifactId>
</dependency>
Configuration
STOMP endpoint를 설정하고 broker 접속 정보를 등록한다.
package com.example.websocket.config;

import org.springframework.context.annotation.Configuration;
import org.springframework.messaging.simp.config.MessageBrokerRegistry;
import org.springframework.web.socket.config.annotation.EnableWebSocketMessageBroker;
import org.springframework.web.socket.config.annotation.StompEndpointRegistry;
import org.springframework.web.socket.config.annotation.WebSocketMessageBrokerConfigurer;
import org.springframework.web.socket.server.support.DefaultHandshakeHandler;

@Configuration
@EnableWebSocketMessageBroker
public class BrokerWebSocketConfig implements WebSocketMessageBrokerConfigurer {

	/*
	웹 소켓 접속 endpoint 설정
	 */
	@Override
	public void registerStompEndpoints(StompEndpointRegistry stompEndpointRegistry) {
		stompEndpointRegistry.addEndpoint("/stomp")
			.setAllowedOriginPatterns("*")
			.withSockJS();
	}

	/*
	Activemq broker 연결 정보 등록
    activemq broker 연결 정보는 activemq 설치 docker compose 참고
	 */
	@Override
	public void configureMessageBroker(MessageBrokerRegistry messageBrokerRegistry) {
		messageBrokerRegistry
			//broker prefix로 /queue, /topic을 지정하였다.
			.enableStompBrokerRelay("/queue", "/topic")
			.setRelayHost("localhost")
			.setRelayPort(61613)
			.setClientLogin("admin")
			.setClientPasscode("admin_password");
		messageBrokerRegistry.setApplicationDestinationPrefixes("/app");
	}
}
@EnableWebSocketMessageBroker는 메시지 브로커를 통해 WebSocket 메시지 처리를 활성화한다.
registerStompEndpoints() 메서드
- websocket 연결 endpoint를 /stomp로 등록한다.
- setAllowedOriginPatterns("*")로 지정하여 특별히 제약을 두지 않았다.
configuredMessageBroker() 메서드
- enableStompBrokerRelay("/queue", "/topic") 호출은 브로커가 /queue, /topic 접두사가 붙은 대상의 메시지를 클라이언트에게 다시 전달할 수 있도록 설정한 것이다.
- messageBrokerRegistry.setApplicationDestinationPrefixes("/app") 은 @MessageMapping annotation이 달린 메서드에 바인딩된 메시지에 대해서 /app 접두사를 지정한다.
메시지 DTO
package com.example.websocket.dto;

import com.fasterxml.jackson.annotation.JsonProperty;

public record WebSocketDto(
	@JsonProperty("messageId") String messageId,
	@JsonProperty("message") String message
) {}
EventListener
@EventListener를 통해서 아래 event를 수신할 수 있다.
- BrokerAvailabilityEvent
- SessionConnectEvent
- SessionConnectedEvent
- SessionSubscribeEvent
- SessionUnsubscribeEvent
- SessionDisconnectEvent
각 Event에 대한 설명은 spring 문서를 참고하면 도움이 된다.
package com.example.websocket.event;

import lombok.extern.slf4j.Slf4j;
import org.springframework.context.event.EventListener;
import org.springframework.messaging.simp.SimpMessageHeaderAccessor;
import org.springframework.messaging.simp.broker.BrokerAvailabilityEvent;
import org.springframework.stereotype.Component;
import org.springframework.web.socket.messaging.*;

@Component
@Slf4j
public class WebSocketEventListener {

	@EventListener
	public void brokerAvailabilityEvent(BrokerAvailabilityEvent event) {
		log.info("received broker avail ability event: {}", event);
	}

	@EventListener
	public void sessionConnectEvent(SessionConnectEvent event) {
		SimpMessageHeaderAccessor accessor = SimpMessageHeaderAccessor.wrap(event.getMessage());
		log.info("received session connect event: session id={}", accessor.getSessionId());
	}

	@EventListener
	public void sessionConnectedEvent(SessionConnectedEvent event) {
		SimpMessageHeaderAccessor accessor = SimpMessageHeaderAccessor.wrap(event.getMessage());
		log.info("received session connected event: session id={}", accessor.getSessionId());
		log.info("session destination: {}", accessor.getDestination());
	}

	@EventListener
	public void sessionSubscribeEvent(SessionSubscribeEvent event) {
		SimpMessageHeaderAccessor accessor = SimpMessageHeaderAccessor.wrap(event.getMessage());
		log.info("received session subscribe event: session id={}", accessor.getSessionId());
		log.info("session destination: {}", accessor.getDestination());
		log.info("session subscription id: {}", accessor.getSubscriptionId());
	}

	@EventListener
	public void SessionUnsubscribeEvent(SessionUnsubscribeEvent event) {
		SimpMessageHeaderAccessor accessor = SimpMessageHeaderAccessor.wrap(event.getMessage());
		log.info("received session ubsubscribe event: session id={}", accessor.getSessionId());
		log.info("session destination: {}", accessor.getDestination());
		log.info("session subscription id: {}", accessor.getSubscriptionId());
	}

	@EventListener
	public void sessionDisconnectEvent(SessionDisconnectEvent event) {
		SimpMessageHeaderAccessor accessor = SimpMessageHeaderAccessor.wrap(event.getMessage());
		log.info("received session disconnect event: session id={}", accessor.getSessionId());
		log.info("session destination: {}", accessor.getDestination());
		log.info("session subscription id: {}", accessor.getSubscriptionId());
	}
}
단순히 event 발생에 대한 로그만 기록하도록 하였다.
Controller
@MessageMapping 어노테이션을 통해 inbound 채널 바인딩을 한다.
@SendTo 어노테이션을 통해 /queue, /topic 접두사가 붙은 대상의 메시지를 클라이언트에게 다시 전달한다.
package com.example.websocket.controller;

import com.example.websocket.dto.WebSocketDto;
import org.springframework.messaging.handler.annotation.MessageMapping;
import org.springframework.messaging.handler.annotation.SendTo;
import org.springframework.messaging.simp.annotation.SendToUser;
import org.springframework.stereotype.Controller;

@Controller
public class WebSocketBrokerController {

	@MessageMapping("/broadcast")
	@SendTo("/topic/messages")
	public WebSocketDto broadcastMessage(WebSocketDto webSocketDto) {
		return webSocketDto;
	}

	@MessageMapping("/queue")
	@SendTo("/queue/messages")
	public WebSocketDto queueMessage(WebSocketDto webSocketDto) {
		return webSocketDto;
	}
}
클라이언트는 /topic/messages 혹은 /queue/messages를 구독하여 메시지를 수신한다.
Application main
package com.example.websocket;

import org.springframework.boot.SpringApplication;
import org.springframework.boot.autoconfigure.SpringBootApplication;
import org.springframework.context.annotation.Import;

@SpringBootApplication
public class WebsocketApplication {

	public static void main(String[] args) {
		SpringApplication.run(WebsocketApplication.class, args);
	}

}
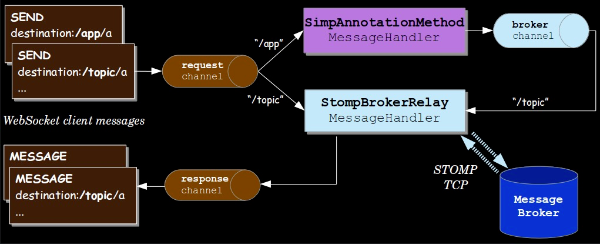
Message Flow
StompBrokerRelay를 사용한 message flow는 아래와 같다.
apic를 통한 STOMP 테스트
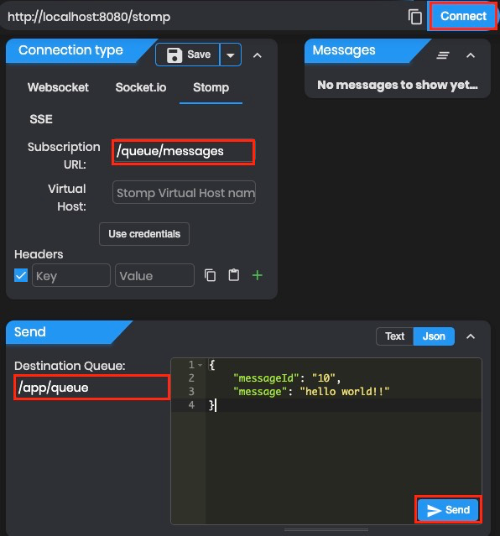
chrome 확장 기능으로 apic를 설치하여 STOMP 동작에 대해서 테스트해볼 수 있다.
apic에서 STOMP 테스트를 하려면 상단 좌측 메뉴에서 Tester를 선택하면 된다.

아래 이미지와 동일한 연결 설정을 3개의 탭에 생성한 후 Connect를 수행한다.

서버 로그는 아래와 같이 생성된다.
[tboundChannel-1] c.e.w.event.WebSocketEventListener       : received session connected event: session id=ibvm1vtz
[tboundChannel-2] c.e.w.event.WebSocketEventListener       : received session connected event: session id=ww231hgr
[tboundChannel-3] c.e.w.event.WebSocketEventListener       : received session connected event: session id=zg45lix0
하나의 연결 세션에서 메시지를 전송해 본다.

각 세션 탭 우측 상단 Messages 영역에 아래와 같이 메시지를 수신하는 것을 확인할 수 있다.

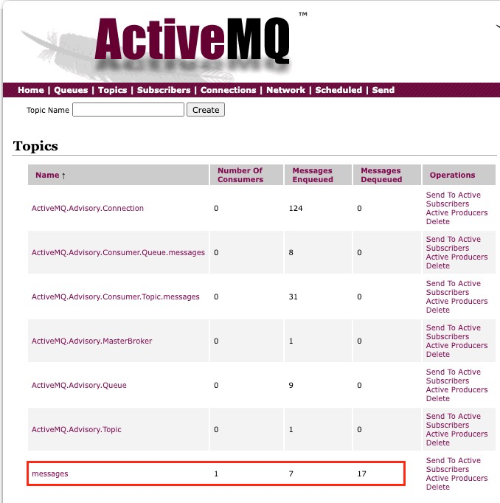
로컬에 설치된 activemq 관리 페이지에 접속 후 Topics에 messages 이름의 topic이 생성되었음을 확인할 수 있다.
Subscription URL을 /topic/messages로 설정하여 topic을 통해서 메시지를 broadcast 하도록 하였다.
Subscription URL을 /queue/messages로 설정하여 queue를 통해서 연결 세션 중 하나에서만 메시지를 수신하도록 할 수도 있다.
로컬에 설치된 activemq 관리 페이지에 접속 후 Queues에 messages 이름의 queue가 생성되었음을 확인할 수 있다.

샘플코드는 https://gitlab.com/blog4031530/spring-websocket-broker 에서 확인 가능하다.
참고링크
https://spring.io/guides/gs/messaging-stomp-websocket/
Getting Started | Using WebSocket to build an interactive web application
In Spring’s approach to working with STOMP messaging, STOMP messages can be routed to @Controller classes. For example, the GreetingController (from src/main/java/com/example/messagingstompwebsocket/GreetingController.java) is mapped to handle messages t
spring.io
https://docs.spring.io/spring-framework/reference/web/websocket/stomp.html
STOMP :: Spring Framework
The WebSocket protocol defines two types of messages (text and binary), but their content is undefined. The protocol defines a mechanism for client and server to negotiate a sub-protocol (that is, a higher-level messaging protocol) to use on top of WebSock
docs.spring.io
'스프링부트' 카테고리의 다른 글
| spring boot 로그백 (logback) 설정 방법 (0) | 2023.10.14 |
|---|---|
| spring boot logging (0) | 2023.10.12 |
| spring boot scheduler basic (0) | 2023.10.09 |
| spring boot kafka 연동하기 (0) | 2023.10.08 |
| spring bean scope (0) | 2023.10.03 |

댓글